AEG COMPETENCE E3140-1 User Manual
Browse online or download User Manual for Cookers AEG COMPETENCE E3140-1. AEG COMPETENCE E3140-1 User's Manual
- Page / 56
- Table of contents
- BOOKMARKS
- COMPETENCE E3140-1 1
- Dear Customer 2
- Contents 3
- Safety Instructions 5
- Intended Use 6
- Disposal 7
- Appliance Assembly 8
- Clock Functions 9
- Oven Features 10
- Oven Accessories 11
- Oven Functions 12
- Initial Cleaning 14
- Set the Time 15
- Resetting the Time 16
- Using the Rings 17
- Cooking with the Rings 18
- Using the Oven 19
- Switching the Oven On and Off 20
- Using the Automatic Function 21
- Countdown 24
- Oven safety cut-out 25
- Uses, Tables and Tips 26
- Baking Table 29
- Tips for Baking 31
- Pies and Gratin Table 32
- Frozen Ready Meals Table 33
- Roasting 34
- Table for Roasting 36
- Grilling 38
- Grilling table 38
- Defrosting 39
- Defrosting table 39
- Preserving 40
- Preserving times 40
- Cleaning and Care 41
- Side Support Rails 42
- Cleaning with Pyroluxe 44
- Oven Light 44
- Oven Door 45
- Oven Door Glass 46
- What to do if 48
- Technical Data 50
- PNC . . . . . . . . 55
- S No. . . . . . . . 55
Summary of Contents
COMPETENCE E3140-1The Built-In Pyrolitic Oven Operating Instructions
10Oven FeaturesShelf positions There is a shelf support rail on both sides of the oven, with 5 shelf posi-tions on which to insert the acces-sories.
11Oven AccessoriesThe following parts are supplied with the oven:Combination shelf For dishes, cake tins, items for roasting and grillingUniversal b
12Oven FunctionsThe oven has the following functions:H Hot air Hot air is particularly suitable for baking biscuits on 2 levels at the same time.The o
13A Defrosting Using the defrost oven function you can partially- or completely and evenly defrost foods such as flans, butter, bread, fruit or other
14Before Using for the First TimeInitial CleaningBefore using the oven for the first time you should clean it thoroughly. You can switch on the oven l
15Set the Time3 The oven will only operate when the time has been set. When the power supply is switched on, or after a power failure, the function in
16Resetting the Time0 Press button b until the function indicator flashes on the clock display D . 3. Using buttons + or - set the cur-rent time. 4.
17Using the RingsAlso refer to the operating instructions for your built-in cooking unit. It contains important information on ovenware, operation, cl
18Cooking with the Rings 0 1. Select a high heat setting to boil/fry. 2. As soon as steam appears or the fat is hot, lower the setting to the required
19Using the Oven Positioning the Shelf Unit and the Universal Baking TrayAll slide-in units have a small bulge on the left and right. This bulge serve
2 Dear Customer,Please read these operating instructions carefully.In particular please note the "Safety"“ section on the first pages. Plea
20Switching the Oven On and Off0 1. Turn the "Oven Functions“ switch to select the required function. 2. Turn the "Temperature Selection“ sw
21Using the Automatic Function3 The required oven function and temperature can be selected before or after setting the automatic function. You can sel
22End time >Using the end time function > you can set the oven to switch off au-tomatically.0 1. Keep pressing the button ] until the end time f
23Cook time < and end time > combined3 Cook time < and end time > can be used simultaneously if the oven is required to switch on and off
24CountdownAt the end of the countdown ] an acoustic signal will sound. 1. Keep pressing button ] until the countdown function indicator ] flashes. 2.
25Oven safety cut-out3 If not switched off after a certain time, or the temperature is not changed, the oven switches off automatically.The red tempe
26Uses, Tables and TipsCookingThe information given in the following tables is for guidance. The switch setting required for cooking depends on the qu
27BakingFor baking use the hot air H oven function or conventional O .Baking tins• When using conventional heat O coated baking tins or tins made of d
28General information• Always count the shelf positions from the bottom upwards.• Insert baking sheets with the bevelled edge to the front! • Always p
29Baking Table Type of Cake or Pastry Hot Air H Conventional O TimeShelf Position from BottomTemper-atureºCShelf Position from BottomTempera-tureºCFor
3ContentsSafety Instructions . . . . . . . . . . . . . . . . . . . . . . . . . . . . . . . . . . . . . . . . . . . . 5Disposal . . . . . . . . . . .
30Fruit flan(with a yeast dough/sponge base)3 140-160 3 170-190 0:25-0:50Fruit flan with shortcrust pastry base23 150- 170 3 170-190 0:40-1:20Tarts ba
31Tips for BakingTipTo tell if your cake is cooked throughPush a wooden skewer into the highest point of the cake. If the skewer comes out clean, you
32Pies and Gratin TableConventional O Rotitherm I Time Shelf position from bottomTemp. °C Shelf position from bottomTemp. °CHrs: Mins.Pasta bake
33Frozen Ready Meals Table3 When frozen foods are used the trays inserted may distort during cook-ing. This is because of the large differences in tem
34RoastingUse the rotitherm I oven function or conventional O when roasting.Ovenware for roasting• Any heat-resistant dish is suitable for roasting. •
35Notes on the roasting tablesInformation is given in the table on suitable oven functions, tempera-ture settings, cooking times and shelf positions f
36Table for RoastingType of Meat Quantity Conventional O Rotitherm I TimeWeight Shelf Po-sition from BottomTempera-tureºCShelf Position from BottomT
37GameWhole piece of hare,haunch or jointed hareup to 1 kg3220-25013 160-170 0:25-0:40Saddle of venison 1.5-2 kg 1 210-220 1 160-180 1:15-1:45Haunch o
38GrillingTo grill, use oven function Z for dual grill or F for single grill with temperature setting z .1 Important: Always preheat the empty oven wi
39DefrostingUse the defrost oven function for defrosting.Dishes for defrosting• Put the food on a plate and put the plate on the shelf unit.• Use on
4Defrosting . . . . . . . . . . . . . . . . . . . . . . . . . . . . . . . . . . . . . . . . . . . . . . . . . . . . . 39Defrosting table . . . . . .
40PreservingWhen preserving use the hot air H oven function. Preserving jars• Only use commercially available preserving jars (preserving jars with a
41Cleaning and Care Exterior of the Appliance0 Wipe the front of the appliance with a soft cloth and warm, soapy wa-ter. • Do not use scourers, caust
42Side Support RailsThe side support rails on the left and right hand sides of the oven can be removed for cleaning the side walls.Removing the side s
43Fitting the side support rails1 Take care when fitting the rails that the rounded ends of the guide rails are pointing forwards!0 1. To replace, fir
44Cleaning with Pyroluxe1 Warning! The oven becomes very hot during pyroluxe self-cleaning. Keep young children well away from the oven.1 Important: B
45Oven Door The oven door of your appliance may be removed for cleaning.Removing the oven door0 1. Open the oven door completely.2. Completely fold ba
46Oven Door Glass The oven door is fitted with four glass panels mounted one behind the other. The three inner panels may be removed for cleaning.1 Wa
47Inserting the glass door panels3 The three removeable glass panels differ in size.They will only fit into the section of the door for which they are
48What to do if ... the cooking zones don't work?0 Check whether – the appropriate cooking zone has been switched on,– the circuit breaker (
49If you call in customer service to resolve a problem listed in these notes, or to rectify a problem caused by incorrect operation of the appliance,
51 Safety InstructionsThe installation and connection of the new appliance must only be car-ried out by a registered specialist. Where damage occurs t
50Technical DataOven Interior DimensionsRegulations, Standards, DirectivesThis appliance meets the following standards:• EN 60 335-1 and EN 60 335-2-6
51
53
54IndexAAnti-tip device . . . . . . . . . . . . . . . . . . . . . . 10BBaking . . . . . . . . . . . . . . . . . . . . . . . . . . . . . 27CCleaning
55ServiceThe section "What do I do if...“ lists some faults that you can remedy yourself. Look there first if a fault occurs. Is it a technical f
AEG Hausgeräte GmbHPostfach 1036D-90327 Nürnberghttp://www.aeg.hausgeraete.de© Copyright by AEG822 947 476-NO-250102-02Subject to change without noti
6Intended Use• This appliance is intended to be used for cooking, frying and baking food in the home and must not be used for any other purpose.• Only
72 DisposalDisposing of packaging materialAll materials used can be fully recycled.The cardboard container is made from 80% recycled paper. Plastics a
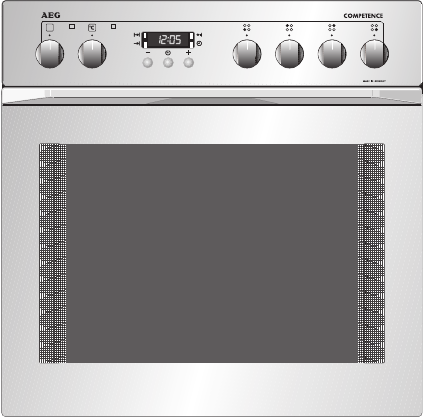
8Appliance AssemblyControl PanelThe rotary switches used to operate the oven and rings can be read from above. Oven functions Rotary switch used for s
9Clock FunctionsYour appliance has a programmable clock by which you can see the time, use the countdown timer as an "egg-timer“ or set baking an
Related products and manuals for Cookers AEG COMPETENCE E3140-1
 (52 pages)
(40 pages)
(40 pages)
(28 pages)
(52 pages)
(68 pages)
(52 pages)
(40 pages)
(40 pages)
(28 pages)
(52 pages)
(68 pages)
 (389 pages)
 (68 pages)
(254 pages)
(237 pages)
(29 pages)
(68 pages)
(254 pages)
(237 pages)
(29 pages)

 (36 pages)
(56 pages)
(39 pages)
(44 pages)
(36 pages)
(32 pages)
(36 pages)
(34 pages)
(36 pages)
(56 pages)
(39 pages)
(44 pages)
(36 pages)
(32 pages)
(36 pages)
(34 pages)
© 2020, manymanuals.com. All rights reserved. | 1.075 s |
 Manymanuals.com
 Manymanuals.de
 Manymanuals.fr
 Manymanuals.it
 Manymanuals.pl
 Manymanuals.cz
 Manymanuals.es
 Manymanuals-pt.com
Comments to this Manuals